
MS Word 2003 can store 24 items in its Clipboard and then paste all of them in the same order that you saved them (the last one saved pasted the last).
Why is this such a great function? Because it allows you to gather study and research materials from all kinds of different sources and then compile them within the same Word document for your easy reference and/or re-writing.
1) First of all, make sure your Task Pane is displaying by clicking Ctrl+F1
2) Then click the downward pointing little black triangle on the upper right of the Task Pane and select Clipboard to display the contents of your Clipboard.
3) Now go to any web site you want and select a certain text that interests you. Then copy it by pressing Ctrl+C
4) Next, open an Excel sheet and select any table you like. Then copy it by pressing Ctrl+C
5) Open any Word document you like and select any text of interest. Then copy it by pressing Ctrl+C
You can repeat this up to 24 clipboard items.
All these three items of interest from three different sources/application will be displayed in your Clipboard list.
6) Now, click the Paste All button on the Task Pane to have all of them pasted one after another in your Word document.
This powerful function to gather information from dissimilar sources and then display them all within the same Word document will open new research and writing possibilities for you. Y
You can use MS Word 2003's 24-item clipboard to gather all your notes neatly into the same Word document thanks to the "Paste All" command.
Enjoy!
Saturday, August 30, 2008
Friday, August 29, 2008
MS Word - How to Change the Image of Toolbar Button and How to Record a Macro?
If you do not like the way a MS Word toolbar button looks, you can change its image very easily.
1) Select Tools > Customize from the main menu to display the Customize dialog box.
2) Select the button (the image of which you would like to change) by clicking on it directly on the toolbar. A black rectangle will display around the selected button.
3) Click the Modify Selection button in the Customize dialog box to display the drop-down menu.
4) Select Change Button Image option to display all the wonderful icons available to you. Select one and presto! Your toolbar button now has a new spiffy look!
5) If you would like to edit an image by hand to anything you like, you can do that as well by selecting the Edit Button Image option.
************ How to Record a Word Macro?
Recording and running macros in MS Word will save you from re-performing repetitive tasks.
Imagine for example that you would like to transform certain words in a document by changing the font family to Brittanic Bold and increasing the font size to 24 points.
If in a 10,000 word document you have 100 such words to change, wouldn’t it be much better to do it by just clicking a button on your toolbar rather than changing the font family and size 100 times in a row?
This is how you can record and use a Word macro:
1) Select Tools > Macro > Record New Macro from the Word menu to display the Record Macro dialog box.
2) Type in a Name for your macro in the “Macro name” field.
3) Click the Toolbars button to display the Commands tab of the Customize dialog box.
4) Click and hold your cursor on the macro listed in the Commands list-box of the tab. The cursor tip should change into a “+” sign. Drag and drop the macro in anywhere you like on your toolbar. When the cursor changes into a vertical “I beam” it means it is ready to drop your newly created macro button at the selected spot on your toolbar.
5) Then go ahead and change the font family to Brittanic Bold and font size to 24 (through Format > Font dialog box).
6) When you are done, click the STOP button on the mini “Macro tool bar” displaying over your document and you are done.
Now every time you select a word or a paragraph and then click the macro button on your toolbar, your selection will automatically be changed to the new font, size 24. Isn’t that great?
Thursday, August 28, 2008
MS Word – Create a Colorful Venn Diagram Easily
I love Venn Diagrams because nothing comes to close to expressing the logical relationships between different sets of elements that well.
With Microsoft Word 2003 you can create fantastic looking and colorful Venn Diagrams on the fly, with as many elements and colors as you need.
It helps to launch your DRAW toolbar first before you do anything else.
Then follow these steps:
1) Click the 3-balls icon (the tooltip text should read “Insert Diagram or Organization Chart”) to display the Diagram Gallery dialog box.
2) Click and select the Venn Diagram icon on the lower-center to insert a default Venn diagram and also to display the Diagram mini tool-bar.
3) To add a new set of elements (represented by each CIRCLE in the diagram), click the Insert Shape button on the mini tool-bar.
4) To move the circle shapes around, click the clockwise or counterclockwise buttons until you get the desired positioning.
5) Click the “Click to Add text” text to enter any text you want to identify the individual elements.
6) Click the Text Wrap button to apply text wrapping, if there is any need.
7) Click Autoformatting button on the mini tool-bar to select a pre-saved format template for the whole diagram.
8) You can change the formatting of any individual slice by selecting it and then clicking the appropriate formatting buttons on the DRAW toolbar.
Wednesday, August 27, 2008
MS Word - How to Create and Use a Customized Dictionary?
Microsoft Word comes with a powerful dictionary and spell checker. It is very easy to add new words to MS’s default customary dictionary (file name: CUSTOM.DIC) as well.
When MS comes across a word that is not in this default dictionary, the right-click pop-up menu asks whether you’d like to “Add to Dictionary”. Click that option and you are done. The new word is added to CUSTOM.DIC. Next time, MS will know how to correct the misspelling of that particular word.
But sometimes, when you are writing about a very esoteric subject, or perhaps when you are using many foreign words or jargon, or working on a temporary project, you may want to keep the default custom dictionary as is and create your own project-specific customized dictionary. When the project is done, you may want to remove it from your computer altogether.
***** How to create your own customized dictionary?
1. Launch your Note pad, or non-MS Word writing program. (MS Word unfortunately inserts a lot of invisible code to the text which might affect your dictionary list in unpredictable ways.)
2. Enter all your special words, one word per line. Make sure to enter multi-word phrases one word per line. After you type in each word, press Enter and go to the next line.
3. Give your special dictionary a name that ends with “.dic” (For example, “SoccerDictionary.dic”) and save it to C:\Documents and Settings\Application Data\MicrosoftProof
***** How to launch and use your customized dictionary?
1. Open the text that you would like to spell check by using your customized dictionary.
2. Select Tools > Options.
3. Select the Spelling & Grammar tab.
4. Click Custom Dictionaries button to display the Custom Dictionaries dialog box. You will see your newly created dictionary is listed in there, right next to the CUSTOM.DIC.
5. Check the check-box of your customized dictionary (if you like, IN ADDITION to the CUSTOM.DIC. It would not hurt.) Do NOT remove “CUSTOM.DIC” since that would impact all the other MS documents that have already used it.
6. While you are here, you can also modify the content of any listed dictionary by selecting it and clicking the Modify button. You can easily add new words in this fashion.
7. Click OK and return to your main document.
Now when you do a spell check (F7), Word will suggest alternatives not only from its default dictionary but from the custom dictionary that you have created as well.
Alternatively, when you right click your mouse over a word that has a red underline, Word will suggest alternatives not only from its default dictionary but from your customized dictionary as well.
You can create and use as many similar customized dictionaries as you like. And when you are done with that special project, you can just simply turn them off at Tools > Options > Spelling & Grammar > Custom Dictionaries.
If you think you’ll never again use that special set of terminology, you can also delete a customized dictionary altogether from the C:\Documents and Settings\Application Data\MicrosoftProof
Tuesday, August 26, 2008
MS Word - How To Make Global Changes To Your Text Document Based On Paragraph Styles?
Imagine you have a long MS Word document containing all kinds of paragraph styles. What are you going to do if you'd like to indent all section headers SIMULTANEOUSLY by one tab to the right and then change their color to red?
Obviously the Find-and-Replace functionality is of no help here. Yes, you can search for the paragraphs by their style but you need to type in a search word or phrase. And after finding the headers with that specific style and search words, you cannot select them all simultaneously for a global edit.
Tracking such headers from the TOC (Table of Contents) would also be very cumbersome and again impossible to select simultaneously.
There is a very easy method to accomplish that in a hurry.
First display the Styles and Formatting pane of your document by selecting Format > Styles and Formatting from your main menu.
Select a paragraph style in the list. It will be framed with a dark blue box.
Bring your cursor on top of the style name to display the drop-down menu arrow.
Click the arrow to display the following options:
Select All X Instance(s)
Modify...
Delete...
Update to match the Selection
Select the "Select All X Instance(s)" option to highlight every piece of text in your document which has that paragraph style.
Then click the right-indent button on your tool-bar. All the headers will be shifted towards right by one tab space.
Then click the Font Color button on your tool-bar and select Red. All your headers will be converted to red.
And you are done! Congratulations.
You can do a much more thorough edit by again selecting all instances of a paragraph style.
But instead of changing the style through the tool-bar buttons, you can display the Modify Style dialog box by selecting "Modify" from the drop-down list of the paragraph style listed in the Styles and Formatting pane.
Every change you make in that dialog box will be reflected instantly in every instance of that paragraph style.
CAUTION: If you select the "Add to template" check box and then click OK, you'll make the changes a permanent part of your style sheet.
Web Sites with Pure CSS and Zero Tables
A great majority of web sites out there are still using TABLES to present content, even if the content has nothing to do with tabulated data.
Yet there are also a growing number of great web sites that contain zero tables. They are built by pure CSS (Cascading Style Sheets).
Here are three of them: Blogger, Microsoft, and CNN.
The screen shots below display the DIV tags used by these sites. As you can see, there's no end to the complex layouts you can achieve with CSS:
(Click the images to enjoy a larger view.)


Firefox 3.0 Lets You View and Remove Cookies
Do you know what kind of cookies the web site you're visiting is placing on your machine?
Now you can easily see and (if you wish) remove those cookies thanks to Firefox 3.0's great cookie editor.
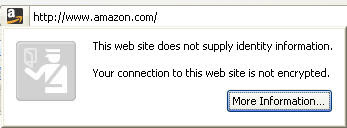
1) When you visit a web site, click on the favicon displayed to the left of the URL:

2) Firefox will display the following dialog box:
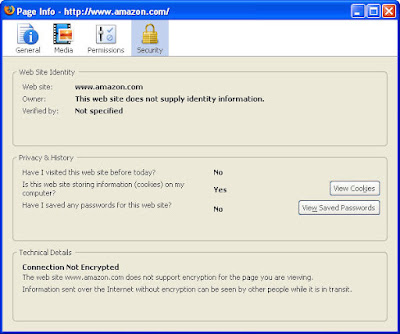
3) Click the More Information button to display the following information dialog box:
4) Click the View Cookies button to see the cookies placed on your computer by this web site:
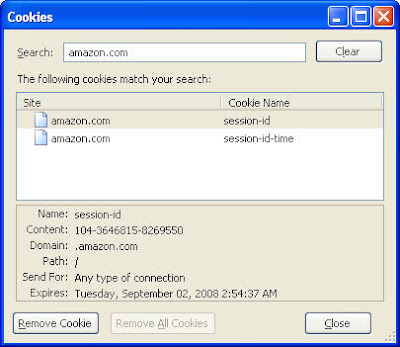
5) Select and click Remove Cookie to delete any cookie you like.
Now you can easily see and (if you wish) remove those cookies thanks to Firefox 3.0's great cookie editor.
1) When you visit a web site, click on the favicon displayed to the left of the URL:

2) Firefox will display the following dialog box:

3) Click the More Information button to display the following information dialog box:

4) Click the View Cookies button to see the cookies placed on your computer by this web site:

5) Select and click Remove Cookie to delete any cookie you like.
Monday, August 25, 2008
MS Word - How To Import Text And Images From Another Document Or Web Site Without Copy And Paste?
MS Word has a very powerful functionality hidden under its hood.
You can import text and images from any other document or web site into your current document without copying and pasting anything.
You can import external content into the body section of your document, as well as into your headers and footers.
NOTE: Whatever you import into headers and footers will be repeated automatically on every page.
WARNING 1: if you are importing from the Internet, make sure you are not trying to import the whole content of a mega web site like Amazon.com since that will certainly crash your system. Do not type the URL of the Index page of big web site since MS Word will attempt to download everything on that site! You have to be careful not to bite too much.
WARNING 2: you should also not import any copyrighted materials from the Internet unless you have the written permission of the site owner, or the material is clearly marked as "Public Domain" content, like the images you can find on Wikipedia. Downloading copyrighted materials for your own use is a violation of the copyright law.
A good practice is to import a single image that sits on its own page and can be reached through a specific URL.
This is how you do it:
1) Place your cursor where you want the new text or image to appear.
2) Then select Insert > Field from your main menu.
3) Select "Include Image" or "Include Text" field from the list-box.
4) In the "Filename or URL" field, type in the address of the file on your hard drive, or the web site URL.
If the text document you want to import is in the same local folder as your current document, then all you need to type in is the full name of that file.
For example, if you are trying to import the content of a local file named "File1.doc", then all you need to do is type "File1.doc" into the "Filename or URL" field.
Let's say, however, that your current document is saved in the My Documents folder but you are trying to import content from a file named "sample.doc" saved on the C drive, then this is what you would type:
C:\sample.doc
5) Click OK and the content you want will appear in your document.
Sunday, August 24, 2008
MS Word Bookmarks for Global Corrections and "Running Headers or Footers"
Imagine you have a 200 page MS Word document with repeating text elements like an address, a name, or a date which repeated over and over throughout the document.
And imagine, after finishing the document, or when it's time to update it, your boss tells you to change the name from "John" to "Bob."
One way to do it of course is to use a global Find and Replace.
But what if you'd like to replace only some of the "John"s to "Bob"? Are you going to check them one by one? Or what if you want to do it automatically without the need to remember to do a Find and Replace?
It's easy. You first mark the source text with a bookmark.
1) Select the text.
2) Select Insert > Bookmark from the main menu.
3) Enter a Bookmark Name (no spaces) and click Add. To see your bookmark on the screen, select Tools > Options > View Tab. Check the "Show Bookmarks" check-box.
The next step -- for all the other instances of this text, enter a REF (Reference) FIELD that points to the BOOKMARK of your reference TEXT.
1) Place your cursor where you want the next instance of the source text to appear.
2) Select Insert > Field from the main menu to display the Field dialog box.
3) Find the REF field in the "Field Names" scroll-down list box.
4) Select REF and then select your BOOKMARK in the "Bookmark Name" list box in the middle.
5) Click OK and your text will be inserted with a gray background screen (which will not be printed), denoting that this is not normal text but a variable field.
Now, every time you make a change to your original text, all other instances will also be changed automatically AFTER you do the following:
1) Select the whole document by selecting Edit > Select All from the main menu, or pressing Ctrl + A.
2) Press the F9 key and BINGO! You've got all instances of your text updated automatically.
P.S. Be careful not to delete the bookmark markers when you are editing your original text. That's why it is important to work by displaying your bookmark markers.
Creating RUNNING HEADERS and FOOTERS
Another great use of Bookmarkers and the REF field variable is in the Headers and Footers.
Imagine you'd like to include the Document Title (not the File Name but the actual name of the document printed on the front cover of the document) or a section title either in the header or the footer. This is also called a "running" header or footer since the header/footer on a page changes depending on selected section headings or titles like the way, for example, you'd see on any phone directory or dictionary page.
Adobe FrameMaker takes care of this much more elegantly by allowing you to assign one or more variables to your header or footer, variables that are fully customizable and indexed to your paragraph tags, so that you can actually have multiple levels of running headers and footers displaying on your pages.
Although MS Word does not provide the same easy functionality to key the headers/footers to paragraph styles, it still can be done by inserting bookmarks and REF variables.
This is how you do it:
Assign a bookmark to the title (or any other source text of your choice) and then insert its corresponding REF field variable into the header or the footer. After updating the text, go back to your header or the footer editing mode (View > Header and Footer) and press F9. All your headers or footers (within that given section) will be updated as well.
NOTE: There is a formatting problem with updating the headers and footers this way since MS Word has the tendency to insert the source text with its original formatting.
If, for example, you are referencing a 24 point document title in your header, your headers will look huge. You can of course select the header text manually and re-format it to a smaller size.
If the next time you update the source text, the length of the updated text is equal to or smaller than the original text, then the header/footer preserves its latest formatting properties.
If, however, your new updated text is LONGER than the previous one, then for only that part of the text which is longer, MS Word switches the formatting back to the original source text format.
For example, if your original document title is composed of two words, "Word Tricks," and your updated document title is either "Word Techniques" or just "Word," then the headers and footers are updated (after going into the header/footer editing mode) nicely by preserving your latest formatting corrections.
However, if your new title is "Word Tricks Explained," then the last extra word "Explained" is displayed in the headers/footers with the original formatting of your document title, creating a lop-sided and aesthetically unpleasant header/footer. In those cases you need to go back to your header/footer and reformat the extra new word(s) as well to match the rest of your header/footer. This is a bug that I hope Microsoft will take care of in the future.
Subscribe to:
Comments (Atom)


