Saturday, December 6, 2008

NeoOffice Recovery Procedure

NeoOffice works pretty well on my MacBook. Actually I've finished a 30 page report on Article Marketing, complete with a full-color cover.

At some point NeoOffice just froze up. I force-quit the application. When I restart it, it presents this beautiful recovery window and recovers every document that was not properly saved when I force-quit. Great functionality. MS Word has it too but NeoOffice is free, including its frequent upgrades. Last time I checked, MS Word wasn't.

BTW -- to take the screen shot of any window, icon or image on a Mac -- press Shift + Command (Apple) + 4 and then hit the SPACE BAR and Mac will display a CAMERA icon. Place "your camera" over the visual element and click it! Presto. The screenshot is automatically saved on your Desktop. That's how I captured the screenshot you see above. You do not need to buy a screenshot software if you've got a Mac.

Monday, November 24, 2008

PRO-FORM for building rapid on-line tutorials

Here is a product that makes life a little bit easier for those of us who are trying to put together a product, service or educational tutorial without any fuss: PRO-FORM (Version 3) from the Rapid Intake company.

I went through their excellent tutorial and liked what I saw. Here are the highlights:
  • Four Quiz Question Types

You can have four quiz question types. The following question types also allow you to add audio or images to any multiple choice question:

Multiple Choice Audio Question
Multiple Correct Audio Question
Multiple Choice Image Question
Multiple Correct Image Question


  • Specific Feedback for Multiple Choice Questions

For any of our Multiple Choice question types (Multiple Choice, Multiple Choice Audio, Multiple Choice Image) you can add a feedback field for each specific option. That means that if a learner picks a specific answer you can control what ProForm will display. There is now an extra field for each distractor.


  • Printing and Email Functionality Added to Quiz

When the learner reaches the results page they will now have an option to print or email the results. There is also an option to include the learner's name if the course is connected to an LMS. The email button allows an email to be sent to a predetermined email address, using the learner's default email application.

  • Four Course Style Templates

You can choose from the following four course style templates:

Red Default Style

Glossy Soft Edges Style

Deep Black Style

Steel Style


  • 6 New Page Templates
Step by Step Template. This template allows you to teach any step-by-step interaction. The steps are listed on the left-hand side. The learner can click on any step for more detailed instructions. This interaction supports up to 9 steps. If you have more steps that this, you can split it into two interactions for more effective instruction.


Video Template. A new template that uses a Flash FLV video.

Jigsaw Puzzle Template. The jigsaw puzzle template is a flash-based interactive template which allows you to change your own image into a jigsaw puzzle. Simply select the image, choose the number of pieces for the puzzle, and let ProForm do the rest! Users then drag and drop the puzzle pieces together to create the image.

Term and Definitions Template. This template teaches definitions to specific terms and then quizzes learners. In this two-step interaction, the first step allows learners to review. In the second step the learners drag the terms to their correct definitions with a drag and drop activity.


Image Rollover Template. This template allows you to present the learner with up to five images. When the learner mouses over each image it enlarges and provides more detailed information.


Certificate Page Template. This page allows you to provide your learners with a certificate when successfully completing a ProForm course. You can choose from two different certificate types or upload your own art. You can restrict the certificate so that it will not display until the learner has visited every page or passed a quiz. Along with other options, you can prompt the learner to provide a name or pull it from an LMS.

For more information on PRO-FORM, click here

Sunday, November 23, 2008

OpenOffice Draw Functions

OpenOffice (OO) is such a powerful office suite but it's a shame most people are not even aware of its power and functionalities, which all come for FREE!

Here are some of the drawing features that are unleashed when you select File > New > Drawing from the main OO menu.

General Drawing Window:


Drop-Down List of Arrows:


Drop-Down List of 3-D Effects (you can transform any shape into 3-D object):


You can arrange the layering (front/back) of multiple objects relative to one another:


You can align the edges of multiple objects relative to one another or center them vertically and horizontally:


You can fill selected objects with photographic binary images:


You can fill your shapes with built-in gradients:


You can fill your objects with pen hatching marks:


You can connect your shapes with many different connectors:


OO Draw comes with built-in drag-and-drop graphic images and exploding stars, etc. (perfect for ads, certificates, etc.)


You can tear individual graphic tabs from the menu and use them all at once on the same drawing!


This is just a snapshot of the few capabilities of this free drawing program. Do you still think you need MS Visio?

Saturday, November 22, 2008

The myths that masquerade as facts

The myth: The Width of the Space Shuttle's Fuel Tank is based on a History that Extends Back to the Roman Chariots!

Summary of the eRumor:

This story is a "We've always done it that way" tale.

It claims that the width of the Space Shuttle's fuel tank is only four-feet, eight-and-a-half inches and the NASA engineers could not make them any wider no matter how hard they tried!

Why?

Because the fuel tanks are transported by railroads and the standard distance between railroad rails in the U.S. is four-feet, eight-and-a-half inches.

Why?

Because that's what it was in England.

Why?

Because that's the gauge the tramways used before the railroads.

Why?

Because the tramways were built using the same tools as wagon-builders and that's how wide the wagon wheels were spaced.

Why?

Because the old roads in England had ruts that the wheels needed to accommodate.

Why?

Because the ruts were made by Imperial Roman chariots.

The Truth:

There is no evidence that we could find that this is true.

THE POINT:
Everything you read or hear on the Internet is not true. Verify first. Believe later.

Friday, November 21, 2008

Use Google Calendar to Remember Birthdays, Anniversaries and Important Dates

I'm blessed with many family members and friends that I love and care for.

The downside is, I can't remember all their birthdays, especially when my extended family grows each year with the arrival of new beautiful babies.

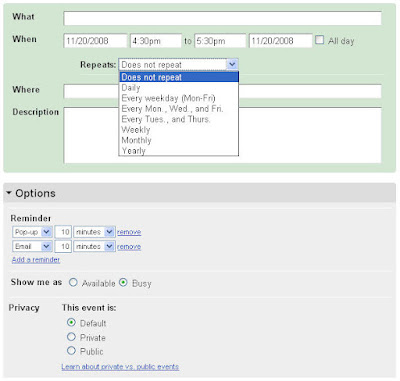
So here is what I do: I enter all those dates into Google Calendar by clicking the Create Event link which displays the following dialog-box page:


In that screen I select and enter the date, hour, name, place, description etc. of the reminder.

I can also select whether this is a yearly, weekly, etc. or a one-time only event.

Google actually allows me to save as many reminders as I like.

So, the "absent-minded professor" that I am, I usually enter 3 reminders for each event: One e-mail reminder a week before the event; another e-mail reminder a day before the event; and a pop-up reminder just minutes before the event.

Google even let's me decide whether to keep the event as a private affair or make it public, in case I'd like to share it with others. You can share your reminder with others by entering their names and e-mail addresses in a field that is not shown in the above screen-shot.

Google is one smart company that makes my life easier and more productive. I'm not paid to say that but that's the truth and I don't mind saying it for free.

Thursday, November 20, 2008

Google Gmail Rolls Out Skin Themes


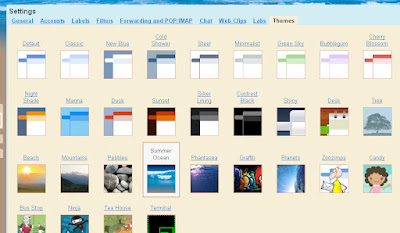
THEMES tab in the Gmail Settings window.

Goodbye to good'old lain-vanilla blue-and-white Gmail!

Now you can select one of the 30 (and counting!) available skins for your Gmail page.


(Screenshot courtesy of Nirmal)

However, at this writing Themes are not available for every Gmail account. For example, I have it on one of my Gmail accounts but not on the other. If you cannot see the THEMES tab inside your SETTINGS window, be patient. It'll be there soon enough.

Friday, September 5, 2008

3 Universal Rules of Good Writing

There are so many different types of writing that it’s futile trying to list them all.

Yet, there are some principles that hold true in almost every writing situation. I’m tempted to call them “Universal Rules” of good writing, in ANY language.

Here are three such rules:

Brevity. If you can express an idea in one word, do NOT use two words. Shorter is always better unless you’re writing a poem or involved in some aesthetic experiment.

For example, “I did go there” is always better than “as a matter of fact, I did go there”. Eliminate the deadwood and allow your text to breathe comfortably.

Modularity. Break down long procedural descriptions into easily digestible short steps.

Chop your long paragraphs into shorter ones.

If writing for the web, don’t be timid to post each sentence on its own line, with white space in between individual sentences.

Headers. Break up your text with bold headers and sub-headers since most people will only skim through the headers.

Headers that contain the gist of the paragraph below increase comprehension and retention.

For example, here is a good one: “How G-30 suntan lotion reduces skin cancer rate”.

And here is a not-so-good header preceding the same hypothetical paragraph: “Suntan Lotion, Sun, and Your Life”.

Thursday, September 4, 2008

MS Word - Assigning Autotext to a Hotkey and a Toolbar

Imagine you have a piece of text that you’d like to quickly add to your documents no matter which document you are in, and regardless of what’s saved in your clipboard.

One solution is to assign that text to a new toolbar button as Autotext.

Here is how to do it:

1) Select Tools > Autocorrect Options from the main menu to display the Autocorrect dialog box.

2) Click and select the Autotext tab.

3) Paste (or type in) your text in the Enter Auto Text Entries Here field.

4) Click Add to have your text listed in the list box below.

5) Close the Autocorrect dialog box.

6) Select Tools > Customize to launch the Customize dialog box.

7) In the Commands tab, select Autotext from the Categories.

8) Find your text in the Commands pane.

9) Click Keyboard button to launch the Customize Keyboard dialog box.

10) Again select Autotext from the Categories and find your text in the Commands pane.

11) In the Press New Shortcut Key enter a new shortcut for this autotext.

Try not to use those shortcuts already in use. For example if you assign Ctrl+V, you’ll be reassigning a very well know shortcut for pasting the content of the clipboard to pasting your custom text. That could lead to confusion.

12) Let’s assume you physically press Control key and then the K key. The shortcut “Ctrl+K” is automatically added as your new shortcut.

13) Click the Assign button and close all windows.
Now, whenever you click Ctrl+A, Word will enter your advisory test at the cursor. You don’t have to type it anymore.

Another method to retrieve your Autotext is to place it in the Toolbar:

In the Customize dialog box:

1) Click and DRAG your autotext to any TOOLBAR you wish.

The text will be inserted as a rectangle. Anytime you click on this rectangle, the associated autotext will be automatically inserted into your text.

However, you can replace this text-button with an icon as well.

2) Select the text-button and click the down-arrow at the end of its toolbar to display the pop-up menu.

3) Select Customize to display the Customize dialog box.

4) Select Autotext from the Categories and find your text in the Commands pane.

5) With the Customize dialog box still open, click the text-button on the toolbar to enable the Modify Selection button.

6) Click Modify Selection button and from the pop-up menu select Change Button Image to display the available icon images.

7) Select an image and then select Default Style option. Your text-button will be replaced by the icon you have chosen. Now every time you click that icon on the toolbar, your autotext will be inserted at where your cursor is.

8) To delete the icon from your toolbar, select Tools > Customize.

9) Click on the icon button and drag it out of the toolbar. This does not delete the autotext from the Customize screen but it’ll delete it from the toolbar.

Wednesday, September 3, 2008

Freelance vs. Corporate Employment for Writers

Which way should you go as a writer? Should you try to swing it out on your own or become an employee for a company?

Here are the pros and cons for each option:

Freelancing

PROS:

Freedom. You are your own person. You don’t need to listen to any boss figure. You “eat what you kill” and some people just love that kind of life.

Variety. Freelancers work on a variety of assignments, depending on client needs. Less chance for boredom.

Money. Successful freelancers earn more than their employee counterparts.

CONS:

Need to sell yourself. You need great social skills. You have to be an outgoing warm personality to win hearts and contracts.

Need to network constantly. You need to have a deep rolodex to keep in touch with decision makers and also with your colleagues for valuable references.

No benefits. You pay everything yourself and usually at a higher rate. Freelancers, for example, pay a lot more for medical benefits since they do cannot get group rates.

Corporate Employment

PROS:

High job security. If you do your job well, you don’t need to worry where your next paycheck is coming from.

Good benefits. Corporations lavish a number of benefits on their employees including medical coverage, paid holidays, and paid training opportunities.

No marketing. Once you find a full-time job, you do not need to market yourself day and night. Your job is there waiting for you every morning.

CONS:

Lower Income. Corporate writers, even if they are at a senior level, make less than experienced freelancers.

Lack of Variety. Some writing positions can become boring in the long run. Try writing assembly instructions for wooden garden furniture day in day out for 5 years.

Lack of independence. Your fate is tied to that of your company. When the company ship goes down, you’re out there without a job.

Tuesday, September 2, 2008

MS Word 2003 - How to Create Customized Letters with Mail Merge

You can easily create dozens and hundreds of letters each addressed to a different person and each including customized references.

For example, you can generate a series of letters that look like these:

LETTER 1:

“B. Smith, 123 Road, Boston, MA Zip1

Dear Bob, It was great meeting you on July 23, 2005 in Cincinnati. I’d love to do business with your company Iron Works General, Inc. …”

LETTER 2:

“Coreen Brandonty, 73 Office Tower, Los Angeles, CA Zip2

Dear Coreen, It was great meeting you on February 3, 2006 in Paris. I’d love to do business with your company Tantastic Lotions, Inc. …”

Etc.

This is how you do it:

1) Fire up your Excel, create an excel spreadsheet and save it. Each variable should be a column. Read across, each RECORD will represent all the variables that you need to customize in a letter.

For example, for the above sample letters, the columns may read Name, Last Name, Street Address, City, State, Zip, Date Last met, City Last Met, Company Name, etc.

2) Switch to MS Word 2003. Create a new blank document.

3) From the main menu, select Tools > Letters and Mailings > Mail Merge to display the Mail Merge SIDEBAR on the right side of your screen. Word will automatically display the Mail Merge TOOLBAR on top of your screen.

4) Click Next to go to the next sidebar screen to start your letter.

5) Select the “Use Current Document” radio button.

6) Click Next to go to the next sidebar screen and select your “recipient database.”

7) Click BROWSE in the sidebar to find the Excel sheet.

8) Click Open. Click through the prompt windows to select the appropriate table(s) and variables. Your spreadsheet should now be listed in the sidebar under the “Use an existing list” section.

9) Click on “Edit Recipient List” and then click OK in the “Merge Mail Recipients” dialog box.

10) Click Next to go to the next sidebar screen to start WRITING your letter.

11) Start typing your letter on the blank page. When you come to a VARIABLE that should change from one recipient to another, click More Items in the sidebar to display the Insert Merge Field dialog box.

12) Select the variable that you’d like to insert into your letter and it will appear as a place holder in between a pair of double-chevrons, depending on the way you have named your columns in the Excel spreadsheet.

13) Repeat Step 13 as many times as necessary as you type your letter.

14) When you finish, click Next to preview your letters.

15) You can now preview your letters one at a time by clicking the Front and Back arrows in the sidebar.

16) Click Next to complete the merge and print the merged letters. At this stage you can also edit the individual letters to add your own customized flourishes and notes.

And you are done! Congrats. Now it’s time to mail them.

You can create individual labels, envelopes, directories and even e-mails following the same steps and selecting options appropriate for the kind of mail-merge you have in mind.

This is one well-tested and bug-free MS Word feature that in my judgment beats OpenOffice’s mailmerge functionality which crashes often.

Monday, September 1, 2008

MS Word - The "Da Gates Code" of Hidden Paragraph Markers

Have you ever wondered why you cannot edit just the way you want to edit a selected numbered list item in MS Word?

Were you ever frustrated by your inability to change the step numbers from, let's say, plain-black to bold-red and then to italic-green (without changing the body text) no matter what you tried?

All that maddening difficulty is due to a "secret style principle" built into the very code of MS Word. If you do not know this secret (and it really is no exaggeration to call it a "secret") no matter what you do to the text of a numbered list item, you will not be able to change the styling of its number. Or conversely, sometimes you'll see "weird" changes that you do not want and can't get rid of!

Here is the secret that will save you untold hours of frustration in the future:

In MS Word, the paragraph style information is embedded not in the paragraph itself but in the PARAGRAPH MARKER! How's that for a surprise?

Therefore, unless you select the paragraph mark that FOLLOWS a listed step, you will not be able to change properties of the list number easily, in a controlled manner.

What is a paragraph mark? It is the character that looks like the Greek letter "Pi." Also know as the "hard return" marker, it is created automatically every time you hit the Return (Enter) key on your key board. If you are using the Word without turning on your text markers you won't see the paragraph markers and you will not know what to select to change the styling of your list numbers.

Thus it is good practice to always have your paragraph markers turned on when you are working with Word.

By only selecting the paragraph marker that follows a numbered step you can assign a different font color from the font color drop-down list and thus have each step start with a differently-colored number while the body text remains the same. How cool is that to impress your friends and clients?

Sunday, August 31, 2008

MS Word -- Slick Word Link in a Blink

You can insert HTML links to your MS Word documents in a split second.

1) Select the target word.

2) Press CTRL and K keys to launch the Insert Hyperlink dialog box.

3) You can link the word selected to an existing file or web page, a bookmark within the same document, an e-mail address, or to a new document. Click the appropriate button in the LINK TO navigation bar.

To link the word selected to a web page or online document, click the Existing FIle or Web Page button in the navigation bar. Then, enter the URL of the page (either somewhere on your server or out there on the Internet) in the ADDRESS field. For example, you can link any word you like to www.cnn.com so that when you click that word you'll be able to read the latest news.

Note: for external web sites do not forget to start the URL with "http://"

To link the word selected to a bookmark, click the Place in This Document button and then select a bookmark from the list of bookmarks displayed on the right.

To link the word selected to a new document, click the Create New Document button and follow the directions.

To link the word selected to an e-mail address, click the E-mail Address button and fill in the associated fields.

4) Click OK and you're done. Now when you click on your word, things will happen, depending on the way you set up your link.

5) To remove the link, select the word and press CTRL and K keys to display the Insert Hyperlink dialog box. Click the Remove Link button and it's gone.

Congrats!

Saturday, August 30, 2008

MS Word 2003 - How to Use the "Paste All" Function?

MS Word 2003 can store 24 items in its Clipboard and then paste all of them in the same order that you saved them (the last one saved pasted the last).

Why is this such a great function? Because it allows you to gather study and research materials from all kinds of different sources and then compile them within the same Word document for your easy reference and/or re-writing.

1) First of all, make sure your Task Pane is displaying by clicking Ctrl+F1

2) Then click the downward pointing little black triangle on the upper right of the Task Pane and select Clipboard to display the contents of your Clipboard.

3) Now go to any web site you want and select a certain text that interests you. Then copy it by pressing Ctrl+C

4) Next, open an Excel sheet and select any table you like. Then copy it by pressing Ctrl+C

5) Open any Word document you like and select any text of interest. Then copy it by pressing Ctrl+C

You can repeat this up to 24 clipboard items.

All these three items of interest from three different sources/application will be displayed in your Clipboard list.

6) Now, click the Paste All button on the Task Pane to have all of them pasted one after another in your Word document.

This powerful function to gather information from dissimilar sources and then display them all within the same Word document will open new research and writing possibilities for you. Y

You can use MS Word 2003's 24-item clipboard to gather all your notes neatly into the same Word document thanks to the "Paste All" command.

Enjoy!

Friday, August 29, 2008

MS Word - How to Change the Image of Toolbar Button and How to Record a Macro?

If you do not like the way a MS Word toolbar button looks, you can change its image very easily.

1) Select Tools > Customize from the main menu to display the Customize dialog box.

2) Select the button (the image of which you would like to change) by clicking on it directly on the toolbar. A black rectangle will display around the selected button.

3) Click the Modify Selection button in the Customize dialog box to display the drop-down menu.

4) Select Change Button Image option to display all the wonderful icons available to you. Select one and presto! Your toolbar button now has a new spiffy look!

5) If you would like to edit an image by hand to anything you like, you can do that as well by selecting the Edit Button Image option.

************ How to Record a Word Macro?

Recording and running macros in MS Word will save you from re-performing repetitive tasks.

Imagine for example that you would like to transform certain words in a document by changing the font family to Brittanic Bold and increasing the font size to 24 points.

If in a 10,000 word document you have 100 such words to change, wouldn’t it be much better to do it by just clicking a button on your toolbar rather than changing the font family and size 100 times in a row?

This is how you can record and use a Word macro:

1) Select Tools > Macro > Record New Macro from the Word menu to display the Record Macro dialog box.

2) Type in a Name for your macro in the “Macro name” field.

3) Click the Toolbars button to display the Commands tab of the Customize dialog box.

4) Click and hold your cursor on the macro listed in the Commands list-box of the tab. The cursor tip should change into a “+” sign. Drag and drop the macro in anywhere you like on your toolbar. When the cursor changes into a vertical “I beam” it means it is ready to drop your newly created macro button at the selected spot on your toolbar.

5) Then go ahead and change the font family to Brittanic Bold and font size to 24 (through Format > Font dialog box).

6) When you are done, click the STOP button on the mini “Macro tool bar” displaying over your document and you are done.

Now every time you select a word or a paragraph and then click the macro button on your toolbar, your selection will automatically be changed to the new font, size 24. Isn’t that great?

Thursday, August 28, 2008

MS Word – Create a Colorful Venn Diagram Easily

I love Venn Diagrams because nothing comes to close to expressing the logical relationships between different sets of elements that well.

With Microsoft Word 2003 you can create fantastic looking and colorful Venn Diagrams on the fly, with as many elements and colors as you need.

It helps to launch your DRAW toolbar first before you do anything else.

Then follow these steps:

1) Click the 3-balls icon (the tooltip text should read “Insert Diagram or Organization Chart”) to display the Diagram Gallery dialog box.

2) Click and select the Venn Diagram icon on the lower-center to insert a default Venn diagram and also to display the Diagram mini tool-bar.

3) To add a new set of elements (represented by each CIRCLE in the diagram), click the Insert Shape button on the mini tool-bar.

4) To move the circle shapes around, click the clockwise or counterclockwise buttons until you get the desired positioning.

5) Click the “Click to Add text” text to enter any text you want to identify the individual elements.

6) Click the Text Wrap button to apply text wrapping, if there is any need.

7) Click Autoformatting button on the mini tool-bar to select a pre-saved format template for the whole diagram.

8) You can change the formatting of any individual slice by selecting it and then clicking the appropriate formatting buttons on the DRAW toolbar.

Wednesday, August 27, 2008

MS Word - How to Create and Use a Customized Dictionary?

Microsoft Word comes with a powerful dictionary and spell checker. It is very easy to add new words to MS’s default customary dictionary (file name: CUSTOM.DIC) as well.

When MS comes across a word that is not in this default dictionary, the right-click pop-up menu asks whether you’d like to “Add to Dictionary”. Click that option and you are done. The new word is added to CUSTOM.DIC. Next time, MS will know how to correct the misspelling of that particular word.

But sometimes, when you are writing about a very esoteric subject, or perhaps when you are using many foreign words or jargon, or working on a temporary project, you may want to keep the default custom dictionary as is and create your own project-specific customized dictionary. When the project is done, you may want to remove it from your computer altogether.

***** How to create your own customized dictionary?

1. Launch your Note pad, or non-MS Word writing program. (MS Word unfortunately inserts a lot of invisible code to the text which might affect your dictionary list in unpredictable ways.)

2. Enter all your special words, one word per line. Make sure to enter multi-word phrases one word per line. After you type in each word, press Enter and go to the next line.

3. Give your special dictionary a name that ends with “.dic” (For example, “SoccerDictionary.dic”) and save it to C:\Documents and Settings\Application Data\MicrosoftProof

***** How to launch and use your customized dictionary?

1. Open the text that you would like to spell check by using your customized dictionary.

2. Select Tools > Options.

3. Select the Spelling & Grammar tab.

4. Click Custom Dictionaries button to display the Custom Dictionaries dialog box. You will see your newly created dictionary is listed in there, right next to the CUSTOM.DIC.

5. Check the check-box of your customized dictionary (if you like, IN ADDITION to the CUSTOM.DIC. It would not hurt.) Do NOT remove “CUSTOM.DIC” since that would impact all the other MS documents that have already used it.

6. While you are here, you can also modify the content of any listed dictionary by selecting it and clicking the Modify button. You can easily add new words in this fashion.

7. Click OK and return to your main document.

Now when you do a spell check (F7), Word will suggest alternatives not only from its default dictionary but from the custom dictionary that you have created as well.

Alternatively, when you right click your mouse over a word that has a red underline, Word will suggest alternatives not only from its default dictionary but from your customized dictionary as well.

You can create and use as many similar customized dictionaries as you like. And when you are done with that special project, you can just simply turn them off at Tools > Options > Spelling & Grammar > Custom Dictionaries.

If you think you’ll never again use that special set of terminology, you can also delete a customized dictionary altogether from the C:\Documents and Settings\Application Data\MicrosoftProof

Tuesday, August 26, 2008

MS Word - How To Make Global Changes To Your Text Document Based On Paragraph Styles?

Imagine you have a long MS Word document containing all kinds of paragraph styles. What are you going to do if you'd like to indent all section headers SIMULTANEOUSLY by one tab to the right and then change their color to red?

Obviously the Find-and-Replace functionality is of no help here. Yes, you can search for the paragraphs by their style but you need to type in a search word or phrase. And after finding the headers with that specific style and search words, you cannot select them all simultaneously for a global edit.

Tracking such headers from the TOC (Table of Contents) would also be very cumbersome and again impossible to select simultaneously.

There is a very easy method to accomplish that in a hurry.

First display the Styles and Formatting pane of your document by selecting Format > Styles and Formatting from your main menu.

Select a paragraph style in the list. It will be framed with a dark blue box.

Bring your cursor on top of the style name to display the drop-down menu arrow.

Click the arrow to display the following options:

Select All X Instance(s)
Modify...
Delete...
Update to match the Selection

Select the "Select All X Instance(s)" option to highlight every piece of text in your document which has that paragraph style.

Then click the right-indent button on your tool-bar. All the headers will be shifted towards right by one tab space.

Then click the Font Color button on your tool-bar and select Red. All your headers will be converted to red.

And you are done! Congratulations.

You can do a much more thorough edit by again selecting all instances of a paragraph style.

But instead of changing the style through the tool-bar buttons, you can display the Modify Style dialog box by selecting "Modify" from the drop-down list of the paragraph style listed in the Styles and Formatting pane.

Every change you make in that dialog box will be reflected instantly in every instance of that paragraph style.

CAUTION: If you select the "Add to template" check box and then click OK, you'll make the changes a permanent part of your style sheet.

Web Sites with Pure CSS and Zero Tables

A great majority of web sites out there are still using TABLES to present content, even if the content has nothing to do with tabulated data.

Yet there are also a growing number of great web sites that contain zero tables. They are built by pure CSS (Cascading Style Sheets).

Here are three of them: Blogger, Microsoft, and CNN.

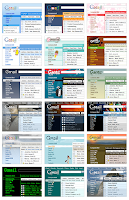
The screen shots below display the DIV tags used by these sites. As you can see, there's no end to the complex layouts you can achieve with CSS:

(Click the images to enjoy a larger view.)


Firefox 3.0 Lets You View and Remove Cookies

Do you know what kind of cookies the web site you're visiting is placing on your machine?

Now you can easily see and (if you wish) remove those cookies thanks to Firefox 3.0's great cookie editor.

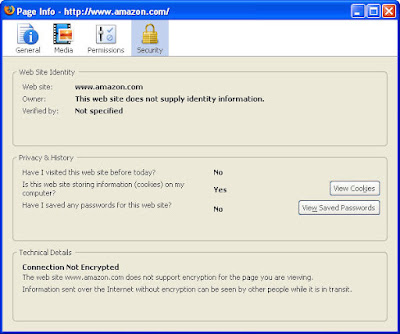
1) When you visit a web site, click on the favicon displayed to the left of the URL:


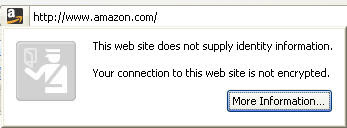
2) Firefox will display the following dialog box:


3) Click the More Information button to display the following information dialog box:


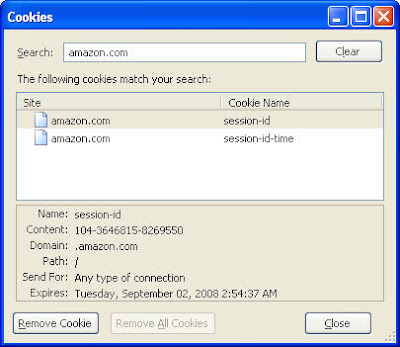
4) Click the View Cookies button to see the cookies placed on your computer by this web site:


5) Select and click Remove Cookie to delete any cookie you like.

Monday, August 25, 2008

MS Word - How To Import Text And Images From Another Document Or Web Site Without Copy And Paste?

MS Word has a very powerful functionality hidden under its hood.

You can import text and images from any other document or web site into your current document without copying and pasting anything.

You can import external content into the body section of your document, as well as into your headers and footers.

NOTE: Whatever you import into headers and footers will be repeated automatically on every page.

WARNING 1: if you are importing from the Internet, make sure you are not trying to import the whole content of a mega web site like Amazon.com since that will certainly crash your system. Do not type the URL of the Index page of big web site since MS Word will attempt to download everything on that site! You have to be careful not to bite too much.

WARNING 2: you should also not import any copyrighted materials from the Internet unless you have the written permission of the site owner, or the material is clearly marked as "Public Domain" content, like the images you can find on Wikipedia. Downloading copyrighted materials for your own use is a violation of the copyright law.

A good practice is to import a single image that sits on its own page and can be reached through a specific URL.

This is how you do it:

1) Place your cursor where you want the new text or image to appear.

2) Then select Insert > Field from your main menu.

3) Select "Include Image" or "Include Text" field from the list-box.

4) In the "Filename or URL" field, type in the address of the file on your hard drive, or the web site URL.

If the text document you want to import is in the same local folder as your current document, then all you need to type in is the full name of that file.

For example, if you are trying to import the content of a local file named "File1.doc", then all you need to do is type "File1.doc" into the "Filename or URL" field.

Let's say, however, that your current document is saved in the My Documents folder but you are trying to import content from a file named "sample.doc" saved on the C drive, then this is what you would type:

C:\sample.doc

5) Click OK and the content you want will appear in your document.